As you may know, May is Celiac Awareness Month. It’s time to celebrate your diagnosis and spread awareness in a positive way. Perhaps giving up gluten was extremely difficult for you or maybe it was as simple as pie. For our family, it was a bit of a challenge in the beginning because we had never even heard of celiac disease until I was diagnosed towards the end of 2008. When we discovered that gluten seemed to be in everything we were eating and not just pizza, bread and beer there was a bit of shock and the feeling that life was definitely going to change in big ways. Several years later, our two younger children also needed to remove gluten (and also dairy) from their diets for medical reasons. I’ll admit that it was initially overwhelming to navigate the public school system, snack time and special occasions. While we are still avid label readers, life has become much easier with both increased personal knowledge and the voluntary labeling ruling of gluten-free foods. I will also say that we seek products with third party certification whenever possible.
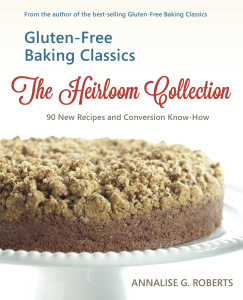
In the spirit of raising awareness, we encourage you to cook and share some of your favorite gluten-free foods with your friends and family. We thought it would be nice to have some new options and turned to our friend and author, Annalise Roberts for some baking inspiration Whether this is your first time cooking since adapting a gluten-free diet or your already a pro at creating family meals without gluten, her newest book, Gluten-Free Baking Classics – The Heirloom Collection can lend a hand when it comes to baking. This book has some scrumptious recipes of both the sweet and savory variety. It also contains chapters discussing how to use specific flours and offers a section about the best dairy substitutions. Annalise Roberts has also authored several other cookbooks including, Gluten-Free Baking Classics, Gluten-Free Baking Classics for the Bread Machine and The Gluten-Free Good Health Cookbook.
If you’re a visual eater like me, you can check out more of her recipes via Yummly. Doesn’t her Ice Box Cake look like a decadent treat?
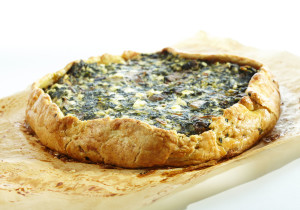
RUSTIC SPINACH & MUSHROOM TART
Here’s a delicious take on Spanakopita made with a delicate pie crust, chopped spinach, thinly sliced mushrooms and tangy feta cheese. This beautiful rustic tart is seasoned with basil and oregano, although dill or nutmeg will also work well. The recipe makes a relatively small tart that’s perfect to feed about four people for lunch, brunch, or a light dinner. It also travels well for picnics.
Makes one 9-inch tart.
Prepared Traditional Pie Crust dough (click here for Pie Crust Recipe)
10 ounces frozen spinach
2 tablespoons olive oil
3/4 cup chopped onion
8 ounces fresh mushrooms, sliced
1 teaspoon dried basil (or to taste)
1 teaspoon dried oregano (or to taste)
1 cup crumbled Feta cheese
1 cup cottage cheese
1 large well-beaten egg
1/2 -3/4 teaspoon salt
1/4 teaspoon freshly ground pepper
1 large egg, beaten to brush on crust
- Cook frozen spinach according to package directions and remove from heat. Squeeze spinach to remove as much liquid as possible (I put it into a fine sieve and press the liquid out with a large spoon). Set aside in a medium mixing bowl.
- Heat oil in a large, heavy fry pan over medium heat. Lightly saute onion until soft (about 5 minutes). Add sliced mushrooms, basil and oregano; cook, stirring frequently until mushrooms release all their liquid. Stir onion and mushroom mixture into cooked spinach. Filling can be prepared ahead of when you will bake tart; store it in a tightly covered container in the refrigerator. Rewarm in microwave when ready to proceed.
- Preheat oven to 400°F. Position rack in bottom third of oven. Line a large baking sheet with parchment paper.
- Roll pie dough into a 12-inch round between two sheets of wax paper. Remove the top sheet and use your fingers to push dough in from the edges to make a perfect 11-inch round. The dough around the edges should now be thicker than the 9-inches across the center (this will make it easier for you to bake the tart the necessary time without the edges getting overdone). Turn the round of dough over onto the parchment paper on baking sheet and remove other piece of wax paper.
- Stir Feta cheese and cottage cheese into spinach and mushroom mixture. Season to taste with salt and pepper. Add beaten egg and stir until well combined.
- Spoon spinach mixture over center of pie dough; pat it into a 9-inch round leaving a 1-inch edge around the outside. Carefully fold edges of dough over spinach filling and push down slightly so the dough is well supported by the filling. Patch any holes in the dough so juices don’t leak out. Generously brush beaten egg over the crust and filling.
- Place in center of rack and bake for about 40 minutes until crust is dark golden brown and filling is hot and cooked through. Cool slightly on a rack before serving.
Store leftovers tightly covered in refrigerator. Rewarm in microwave to serve. Best when eaten within two days of baking.
© 2014 by Annalise Roberts
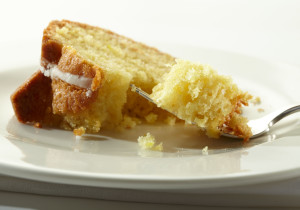
LEMON BUTTERMILK BUNDLE CAKE
This old fashioned lemon buttermilk cake will quietly seduce you with its delicate lemon flavor and tender, moist texture. In fact, you’ll probably find yourself secretly slicing another piece when no one is looking. It’s the kind of cake that’s perfect for a late morning coffee klatch, an afternoon tea, or a casual pot luck supper with friends. Classic in its simplicity, you can dress it up with fresh berries and ice cream or enjoy it on its own.
Makes one 10-inch cake.
2 1/2 cups Brown Rice Flour Mix
1 tablespoon baking powder
1 teaspoon baking soda
1 teaspoon xanthan gum
1/2 teaspoon salt
4 large eggs
1 3/4 cups granulated sugar
3/4 cup plus 2 tablespoons canola oil
1 cup lowfat buttermilk* (dairy-free buttermilk instructions below)
1 teaspoon pure vanilla extract
1 1/2 teaspoons pure lemon extract
1 packed tablespoon grated lemon rind (see Cooks Notes below)
Lemon Glaze (recipe follows) or confectionersâ sugar for garnish
- Preheat oven to 350ºF. Position rack in center of oven. Lightly grease a large 12-cup bundt pan (10-inches across the top) with cooking spray.
- Whisk flour, baking powder, baking soda, xanthan gum, and salt in a small bowl. Set aside.
- Beat eggs in large bowl of electric mixer until lemon colored. Add sugar two tablespoons at a time and beat until pale yellow and thick; scrape bowl. Add flour mixture, oil, buttermilk, vanilla, lemon extract, and grated lemon rind; mix at slow speed for 1 minute, until well combined. Do not overbeat.
- Spread batter into prepared pan. Place in center of oven and bake 50 to 55 minutes or until a toothpick inserted in the center of cake comes out clean. Do not open oven for first 45 minutes.
- Cool cake on a rack for 8 minutes. Carefully remove cake from pan and cool slightly on rack. Spoon Lemon Glaze (below) over top of cake and let it drip down the sides, (or sift confectioners’ sugar over top of cake once it is no longer warm). Allow cake to cool completely before moving to a cake plate.
Serve slightly chilled or at room temperature. Can be made a day ahead. Store cake covered tightly with plastic wrap in refrigerator. Cake can be covered with plastic wrap and then with foil and stored in freezer no longer than two weeks. Best when eaten within three days of baking.
Cooks Notes: Although this cake traditionally has a delicate lemon flavor, you can add 1 extra tablespoon of grated lemon rind to create a more vibrant lemon flavor.
* Substitute 1 cup water and 1/4 cup buttermilk powder for 1 cup fresh lowfat buttermilk.
Dairy-free Buttermilk: combine 1 cup rice or soy milk with 1 tablespoon lemon juice or distilled vinegar. Use only 1 cup of the combined liquid in this recipe.
Lemon Glaze
3 tablespoons unsalted butter
1 tablespoon heavy cream
2 tablespoons fresh lemon juice
1/4 teaspoon pure lemon extract
1 cup confectioners’ sugar
Melt butter in a small, heavy saucepan. Stir in heavy cream, bring to a simmer. Remove from heat, add lemon juice, lemon extract and then confectioners’ sugar in two additions; whisk until very smooth. Cool to lukewarm before drizzling over cake (cool glaze until it is thicker but is still pourable).
Cooks Note: extra glaze that drips down under the rack can be scraped up, rewarmed and drizzled back over the cake to make a thicker topping.
© 2014 by Annalise Roberts
****Disclosure: Although we were provided with a free copy of this book, all opinions are our own. All recipes belong to the author, Annalise Roberts and may not be reproduced without permission.****


 May 24th, 2015
  GFKimAZ


 Posted in
  Tags:
Tags: 


Definitely, recipes and organic and/or vegan options.